Thursday, April 22, 2010

How to Put a Flute Together


So, you just got your first flute, but you don't know how to put it together. Keep reading to learn how.

_______________________________________

  1   To put your flute together, we first need to know the names of the three parts of the flute: 1) Head joint, 2) Body and 3) Foot joint.

  2   Locate the Head Joint.

  3   Locate the Body of the flute.
  4   Locate the Foot Joint.

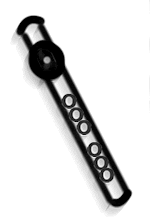
  5   Pick up the Body of the flute. Be careful to pick it up by the barrel (see picture) because we want to avoid grasping the flute by the key work.
  6   While holding your flute by the barrel, pick up the Head Joint. Insert the open end of the Head Joint into the barrel using a twisting motion.

  7   While continuing to hold your flute by the barrel, pick up the Foot Joint (see picture). Carefully insert the Body of the flute (the side opposite the barrel) into the Foot Joint. See picture to know which end of the Foot Joint attaches to the Body.
Also notice in this photograph that the Foot Joint has 3 keys. Many flutes only have 2 keys on the Foot Joint. Do not be alarmed if your flute only has 2 keys. This is perfectly normal.

  8   Now, let's check the alignment of the flute.

  9   Twist the Head Joint (still holding the Body by the barrel) to align the center of the hole in the Head Joint with the center of the key work on the Body as shown in the picture.

 10   Align the Foot Joint with the key work of Body as shown in the picture.

 11   The rod on the Foot Joint should be rotated slightly in from the edge of the keys on the Body.
_______________________________________________
 Tips

Be careful not to hold the flute by the key work to avoid costly repairs.
________________________________

Additional Resources

How to Clean Your Flute

Learn how to quickly clean your flute so that you can keep it in great shape. You'll be confident that the flute you put up to your lips is clean, and you'll add years of life to your musical instrument so that you can keep playing the music you love.


After you have finished practicing or rehearsing, clean your flute to keep it in good working order.

1. Take your flute cleaning rod. (Wooden or plastic cleaning rods are best because they will not scratch the inside of your instrument, but any cleaning rod will do.)
2. Thread a cleaning cloth through the eye of the flute cleaning rod.
Pull cloth through a little.


3. Wrap the cloth around the flute cleaning rod. (This is especially important if you have a metal cleaning rod to prevent scratches on the inside of your instrument.)


4. Push the cloth covered cleaning rod through the foot joint of the flute.
5. Push the cloth covered cleaning rod through the body of the flute.
6. Gently insert the cloth covered cleaning rod into the head joint of the flute. Rotate the rod a few times to wipe the moisture out of the head joint.
7. After you have cleaned the moisture out of the inside of the flute, you may want to wipe the outside of your instrument with a soft cloth from time to time to keep the metal in good shape. Use a soft flannel or soft cotton cloth to wipe away fingerprints and any dirt that may have accumulated on the surface of the flute. Be careful to stay away from the pads as you wipe the outside of the flute.
      ____________________________________________

       Tips
      • A handkerchief makes a great cleaning cloth to clean the inside of your flute. You can also visit your local music store to purchase a flute cleaning cloth.
      • Several companies make flute cleaning kits that you can purchase. These kits usually come with flute cleaning and polishing cloths. Sometimes they contain other items as well. Gemeinhardt, Yamaha, Conn and other musical instrument companies offer flute care kits. Purchase one if you like, but these kits are not absolutely necessary. If you have the items mentioned in this article, you have everything you need to keep your flute clean and in good condition.
      • NEVER put your flute in water to clean it.
      • Never use cleaners or polish (silver polish, etc.) of any kind on your flute. Your flute repair technician will be happy to clean the surface of your flute when you take the instrument in for service.
      • Be careful with the pads on the flute, especially when you are wiping the outside of the instrument.

      Wednesday, April 21, 2010

      How to Care for Your Flute

      The way you treat your flute directly affects how well the instrument performs for you. Having an instrument in good working condition is important to your musical progress. Here you will find a list of guidelines to help you maintain and care for your flute. These tips, in addition to having your flute serviced at least once per year by a trained flute technician, will keep your flute in good working condition so that you can spend more time playing music.

      ____________________________________________


        1. When you first open your flute case, notice how the three pieces of your instrument are arranged inside the case. Remember this position when it is time to return your flute to its case. If you put either of the keyed pieces into the case incorrectly, you risk bending the keys. Be careful where you choose to hold the instrument because holding the keyed mechanisms can bend keys or simply shift them slightly out of alignment. To save money on repair costs and frustration associated with keys that do not close correctly, handle your flute carefully.
        2. Handle your flute with care when you put it together. Hold the flute by the portions without keyed mechanisms, and hold the head joint anywhere but the embouchure plate or the crown. For example, you will want to hold the foot joint below all of the keys, and you will want to hold the middle piece above all of the keys and rods. Then, gently slide one joint into the other. If you must apply a great deal of pressure to get the joints to fit, you might need to clean the metal interlocking parts with a soft, clean cloth (flannel works well). Stubborn joints are usually caused by dirt buildup. Do not put cork grease on the joints because this only complicates the problem by introducing more dirt that will adhere to the cork grease.
        3. To disassemble your instrument, hold the pieces in the same manner you did to put the instrument together, avoiding keyed mechanisms.


        4. In order to get the most use out of your pads and the mechanisms on your musical instrument, you will want to use common sense when taking care of your flute.
        5. First, keep your flute clean. You should wipe the inside after each use using a soft cloth or handkerchief. Wrap the cloth around the cleaning rod found in your case so that none of the rod is exposed. This is especially important if your cleaning rod is metal because you do not want to scratch the inside of your flute. Gently push the cleaning rod through the entire length of the instrument, paying special attention to the head joint. I often reposition the cloth in such a way as to clean all moisture out of the head joint. After you have swabbed the head joint, look into the tube to see if there is any remaining moisture. If there is moisture, swab the joint again. For more information about cleaning your flute, see the article titled, How to Clean Your Flute.
        6. It is also important to maintain the appearance of the outside of your flute. I recommend gently wiping the outside area of your flute with a soft flannel cloth at least once every couple of weeks. This will keep to a minimum the amount of dust in the jointed mechanisms on the rods of the flute and will present a professional appearance when others see your flute. You may use a jeweler's cloth that contains a type of polish on the flute periodically, but never use silver polish or immerse your instrument in water.


        7. Besides cleaning the inside of your instrument, you should take other measures to ensure the long life of the pads on your instrument. Avoid eating sugary foods or drinking sodas before you play or practice. Sugars tend to make the pads sticky and make them rot sooner. I prefer to brush my teeth before playing my instrument, regardless of what I have had to eat or drink.
        8. Keeping the flute in its case when you are not using it is also a good preventative measure. While in the case, it is not exposed to changes in moisture that can ruin the pads or to dust that is constantly in the air. The case also protects it from other accidents.
        9. Be careful about how you lay the instrument down if you are taking a break. You should lay it where the least amount of keys are touching the surface of the table or chair. If you have a flute stand, use it. If not, take special care so that the flute does not roll over onto the keys. Never rest your flute on a music stand!

        10. Lastly, if your flute develops a problem, do not try to fix the problem yourself. Take it to your teacher or a repair person. If you do not know what you are doing, you could end up causing additional problems.


          ____________________________________________
         
         
          Tips
          • Wipe the inside of your flute after each use by using a soft
            cloth or handkerchief.
          • Handle your flute with care. Avoid holding the flute by the keyed
            mechanisms.
          • Have your flute serviced at least once per year by a trained
            flute technician
          • Never rest your flute on a music stand!